 When it comes time to plant potatoes, most amateur gardeners do this: they make markings for future ridges at an equal distance, then dig a hole with a shovel, sow a potato and fill the hole manually, then level it with a rake. During the growth period, the potatoes need to spud, which is often done with hoes. Difficult, long and inefficient. The most rational for planting and subsequent hilling of the ridges is to use a tiller or, as it is otherwise called, hiller.
Content
- 1 What is a rock pile, how is it arranged?
- 2 How to make self-excavator?
- 2.1 Making a vertical stand
- 2.2 Making the front and rear of the
- 2.3 Manufacture of a two-wheeled plow
- 2.4 Pruning knife
What is a rock scoop, how does it work?
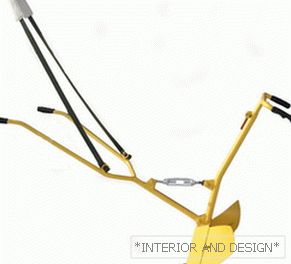
 Manual okuchnik It is a simple tool that you need to work with together. The design is a two-body working body with a pruning knife, front thrust, for which one person pulls the hiller forward and the rear control handles for the second person.
With the help of hilar can significantly to ease many routine maintenance work on the site. This includes cutting furrows for planting potatoes, and subsequent hilling. Also, it is convenient to cut the ridges with a plaster, loosen the soil.
For making hilar you will need:
- hollow tube plumbing for a vertical rack with a diameter of 1 inch and a length of 900−1000 mm;
- hollow tube диаметром ¾ дюйма для передней и задней тяг;
- sheet steel 1-2 mm for the manufacture of dumps;
- talrep for connecting the front linkage and the vertical stand for infinitely variable adjustment of the angle of attack or, if the lanyard could not be found, a steel plate with holes for the stepwise adjustment of the angle of attack;
- pipe bender or blowtorch (gas burner) for heating the metal in places bends;
- welding machine;
- angle grinder (Bulgarian) for processing joints.
How to make self-excavator?
Hiller, который здесь описан, будет иметь несколько адаптивных регулировок:
-
 Height adjustment will be done using telescopic device central pillar: a pipe of a smaller diameter will be inserted into the central pillar tube, which passes into the rear link bar. This will allow a person to adjust the height in accordance with his height and comfortable grip of traction;
 - Adjust the angle of attack. Угол атаки будет регулироваться наклоном центральной стойки относительно горизонтальной плоскости земли. Этого мы добьёмся посредством изменения угла между передней тягой и вертикальной стойкой. Front thrust присоединена шарнирно к центральной стойке и регулировка осуществляется посредством talrepа, что позволит плавно менять угол в зависимости от условий почвы и роста переднего человека. Если у вас нет такого механизма, как talrep, you can adjust the angle by moving the plate with the holes to the desired distance and fix it with pins (bolts).
Making a vertical stand
Pipe length 900−1000 mm and a diameter of 1 inch should be bent at a distance of about 300−400 mm from the end at an angle of 10−15 degrees. Bending is best done with pipe bender (special fixture). If there is no such equipment, you can get a smooth bend as follows: fill the pipe with ordinary sand as tightly as possible, making plugs (wooden wedges) at the ends
Then we heat the fold point with a blowtorch to a reddish color and gradually bend the pipe to the desired angle. The sand inside the pipe will not allow the walls to shrink inward and the pipe keeps round section. We will weld the rear traction and dumps to the vertical rack and fasten the front traction pivotally to the bolt
Making the front and rear of the
The rear linkage is a fork in the shape of the letter “P” with a width of 500 mm and a handle length of about 200 mm. The center of the plug is welded. vertical pipe section 300 mm long. This end of the plug is inserted into the vertical rod. The pipe diameter of из inch bend in the same way as the vertical rack.
To be able to adjust the height of the rack, you need to drill a row of holes in the upper end of the rack and the same row of holes in the vertical part of the fork. By changing the position of the bolt in the holes, you can adjust the height of the rack, depending on the growth of the plowman.
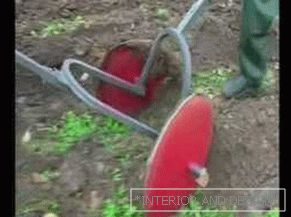 Front thrust made in the form of a fork of the same width as the rear link. The difference in size. The length of the handles of the front thrust should be such that the front man can stand freely between the handles and it is convenient for him to grasp at them.
It is also possible to supply the front linkage. flexible strap который будет надеваться на плечи и грудь и позволит разгрузить руки от чрезмерного усилия. Длина ручек может быть примерно 600 мм. Вертикальную часть вилки делаем длиной 600−700 мм и расплющиваем на конце. В этом месте нам нужно просверлить hole, через которое вилка будет крепиться к вертикальной стойке.
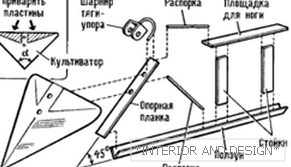
Now you need to make a mechanism to adjust the angle of attack. As stated, ideally this should be a lanyard, but let's consider how to make adjustments using plates with holes. Механизм представляет собой треугольную подвижную систему креплений. Front thrust крепится шарнирно к вертикальной стойке. Предполагается, что человек, тянущий окучник вперёд, держит тягу на неизменной высоте, тогда для того, чтобы изменить угол атаки режущей части окучника, необходимо наклонить вертикальную стойку и зафиксировать её в таком положении. For этого, между стойкой и тягой помещается пластина с рядом отверстий. Изменение положения вертикальной стойки осуществляется changing the length of the plate and fixed with a bolt and nut.
At a height of 300 mm from the bottom to the vertical stand we weld a corner 25 × 25 and a width of 20−30 mm, to which the front linkage will be attached. Next, at a distance of 200-250 mm from the hole, we weld a similar corner 25 × 25 to the plug. In the corner we drill hole. Weld the same corner to the vertical stand above the first corner.
Production of a two-hole plow
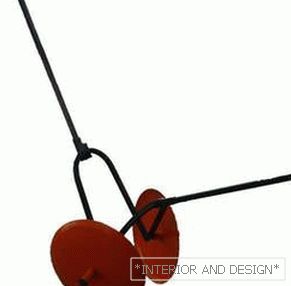
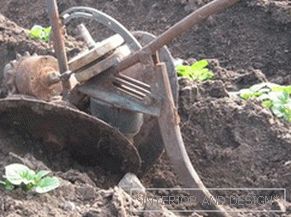 For изготовления отвалов нужно подготовить две одинаковые пластины толщиной 1−2 мм, вырезав их по шаблону. Нужно придать им semicircular bendas on traditional plows. Now it is necessary to weld both halves of the plow to the vertical stand. Often you can see on sale Hiller with a variable angle between the plows, but is it worth doing? You will work on the same site as an excavator, you know your soil and, based on your experience, you will be able to pick up constant angle. So, weld the halves and in the place of their joint create a smooth weld. Grind grinder to get smooth and sharp enough.
Pruning knife
It is he who assumes the main effort and resistance of the soil during the plow deepening. For a knife, you need to take a more carbon steel than on a homemade plow blade. Cut in the form of an arrowhead and sharpen at an angle of 40−45 degrees. This angle will allow the knife to stay sharp longer. It remains to be welded to the lower end of the vertical pillar, to be sanded and the excavator is ready to work!
Of course, from the first pass you will not be able to pick up optimum tilt angle plow, you can not pick up the effort that needs to be made during the deepening of the plow. But on the third-fourth furrow, having picked up the height of the vertical pillar, the angle of inclination and the efforts of both plowmen, the excavator itself “flies”, creating the furrows of the correct shape.


